Preparing Meat and Casings for Optimal Sausage Machine Performance
Ideal Meat Temperature, Fat Ratio, and Grind Consistency for Smooth Flow
Getting those sausages made smoothly starts with how we prep the meat. The ideal temp range for meat is around 32 to 35 degrees Fahrenheit (that's 0 to 2 Celsius) - think partially frozen but still workable. This helps keep things from getting messy during grinding while preventing fat from separating out. Most folks find that a good mix works best with about 70% lean meat and 30% fat content. That gives just enough moisture without making everything soggy or falling apart later on. When grinding, go for medium fine settings between 4 and 6 mm plates. Don't push it too far though because overworking heats things up and messes with the whole emulsion balance. Factory floor reports show commercial kitchens experience roughly 30 percent less jamming issues when they stick to consistent chilling practices and maintain uniform grinding throughout their batches.
Casing Selection, Pre-Soaking, and Pre-Stretching Techniques
Proper casing handling prevents breakage, air pockets, and inconsistent fill.
- Natural casings: Soak 30 minutes in lukewarm water with 1 tsp vinegar per quart to gently soften collagen.
- Collagen or synthetic casings: Rehydrate for 10 minutes in a saline solution (1 tbsp non-iodized salt per cup water).
- Pre-stretch casings gently before loading onto the horn to remove slack and improve control during stuffing.
- Match diameter to application: sheep (18–22 mm) for breakfast links, hog (35–45 mm) for bratwurst or Italian sausages.
Maintaining pliable casings and cold, uniform meat reduces burst rates by up to 40% in high-volume settings.
Step-by-Step Sausage Machine Operation Process
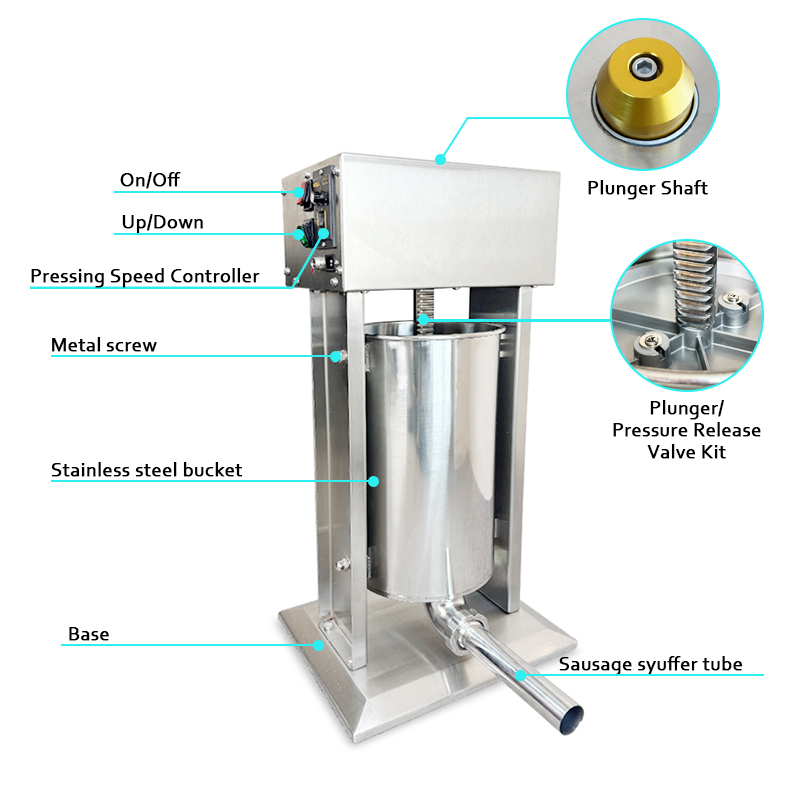
Loading the Hopper and Priming the Cylinder
Always put cold meat that's at or below 40 degrees Fahrenheit (about 4 Celsius) into the hopper. Never use warm stuff or anything that's started to thaw because this messes with the fat distribution and breaks down the emulsion. To get things going right, hand prime the cylinder by pushing the piston forward until clean meat comes out of the nozzle. Getting rid of trapped air is important since it creates holes, makes the texture uneven, and leads to bad links. When people skip this step, jams happen about 30 percent more often when running continuously, which nobody wants to deal with.
Attaching the Horn, Feeding Casings, and Initiating Steady Stuffing
Get hold of the right size horn first, usually around 19 to 22 mm works well for most standard links. After that, put those pre soaked casings on the horn, making sure there's about four inches left hanging out at the end so they stay properly anchored. When starting to stuff, keep the pressure low initially and guide the casing along with gentle but consistent tension throughout. The sweet spot seems to be between 15 and 20 pounds per square inch according to what we've seen in actual production settings. This range helps avoid any unwanted bursts while still getting close to that magic 98 percent fill rate or better. Don't rush things though. Wait until the flow becomes smooth and free of bubbles before slowly ramping up the speed. Rushing too soon just invites trouble down the line.
Twisting, Linking, and Cutting: Achieving Uniform Sausage Lengths and Weight
When working with sausage casings, twist them roughly every five to six inches using that familiar two finger pinch and quarter turn method most butchers know so well. This helps create those neat, uniform links we all recognize. To get the right size, just lay out some sample sausages next to an actual size chart and tweak the feeding speed in half second intervals until they weigh consistently within about plus or minus five percent. For cutting, always reach for those specially designed curved scissors made from food safe materials. They make cleaner cuts that keep the casing intact and stop unwanted juice leaks during cooking. The automated machines can crank out around 1200 sausages per hour with less than 2% difference in weight between each link, which makes sense when looking at large scale operations where maintaining quality while increasing output is absolutely critical.
Mastering Pressure, Speed, and Calibration for Consistent Results
Adjusting Filling Speed and Plunger Pressure to Prevent Burst Casings or Air Pockets
Getting the right balance between filling speed and plunger pressure is really important when working with different emulsions and casings. If we push things too fast, natural casings get stretched past what they can handle. On the flip side, going too slow creates problems too - air pockets form and the fill ends up weak. Most folks find that keeping plunger pressure around 15 to 20 PSI works best for fresh sausage mixtures. This range helps maintain solid extrusion while preventing fat from separating out during processing. When checking how tight the casing looks, watch for telltale signs. A few small wrinkles on the surface usually means pressure is too low. But if the casing becomes shiny and overly stretched, it's about to burst. Collagen casings need special attention since they don't stretch like traditional sheep or hog casings do. Cut down the speed by about 30 percent to avoid those frustrating splits that waste good product.
Calibrating Torque and Tension for Different Casing Types and Sausage Sizes
Getting consistent results means calibrating properly so that sausages come out with the same density, size, and weight every time. For those dense little sheep casings compared to bigger hog ones, bump up the torque around 40 percent to handle their extra resistance without issues. When making thinner sausages like breakfast links, it's best to dial back on tension settings. This helps avoid problems with emulsion breaking apart or getting too hot during processing, all while keeping the weight measurements accurate. A good practice is to test fill three to five sausages from each batch before going full scale. Take a look at them carefully to spot any inconsistencies early on.
- Diameter uniformity (¢2 mm variation)
- End seams (smooth, sealed closures with no leakage)
-
Weight consistency (¢5% deviation from target)
Under-stuffing yields spongy texture and poor shelf appearance; over-compaction strains casings during twisting and increases breakage risk. Recalibrate torque and tension whenever changing emulsion fat content by more than 5%.

Maintaining Your Sausage Machine for Long-Term Reliability
Regular maintenance makes all the difference when it comes to keeping things running smoothly and extending equipment lifespan. After every use, give those food contact areas a good cleaning right away. We're talking about augers, pistons, horns, and casings here. A simple soak in warm soapy water with a gentle brush does wonders for stopping bacteria from growing and preventing stubborn residue buildup that messes with both food safety and how everything flows through the machine. Once a week, don't forget to put on some NSF certified food grade lubricant on those moving parts like pistons, gears, and auger shafts. Just enough to keep them moving freely without wearing down too fast. Every month or so, take a close look at everything for signs of trouble like cracks, rust spots, worn seals, or anything that looks out of alignment. Replace anything that seems compromised before it causes bigger problems during production runs. Keep track of all these maintenance activities in a logbook with dates next to each entry. Who knows? Studies show kitchens that stick to this kind of routine schedule end up cutting their unexpected downtime by around 30%. Plus, products come out looking, feeling, and weighing just right from one batch to the next.